Saturday, July 9, 2011

Fried Zucchini Blossoms


Fried Zucchini blossoms stuffed with ricotta and herbs

  When I was 19, my father took me with him on a business trip to Florence, Italy.  For four glorious May days he attended meetings while I spent my time wandering and watching, walking and exploring and getting my first taste of la vita bella.  The sun-ripened tomatoes, the creamy gelato, the sing-song beauty of the language and the general atmosphere of good times to be had made me fall hard for Firenze, as so many millions had before me.  On the banks of the river Arno I made a promise to myself then that I would return, and of course I did...   
  On our last evening I joined my father and his colleagues- we were being taken for a special dinner in an undisclosed location.  Just as the sun started its descent in the clear sky, the ten of us boarded a tiny little bus- I had no idea where we might be headed.  We drove over a bridge headed for one of the green hills that surrounded the city and started our ascent.  As we climbed higher I could see the ancient city spreading out below us, the red tiled rooftops and towering cupolas glowing in the late evening sun, rippling and shimmery like a mirage.
  We disembarked in front of a small cottage on the hill and were seated in the garden, under a wooden pergola twined with leafy branches and tiny white tree lights that flickered on as the sky darkened to my favorite shade of deepest blue.  The air was sweet with the scent of grass and flowers, and the stars twinkling above seemed to be winking down at me as the wine was poured and the first antipasti platters came out- fried zucchini blossoms. 
   Being a suburban girl I had little concept that zucchinis grew with flowers, and that this flower was not only edible, but delicious with a delicate zucchini flavor.  Leave it to the Italians…  The petals were a rich orange yellow striped with bright green, and some blessed person had stuffed them with stringy warm cheese and fried them to crisp perfection.  What followed was one of the top five meals of my life, but all I can really remember is the way those blossoms tasted in the Tuscan evening air. 
  On Wednesday I scored a box of beautiful healthy male blossoms with stems (the females grow at the end of the vegetable) and I knew what must be done.  These are great fried crisp on their own, but I stuffed them with ricotta and herbs and coated them in a batter spiced with garam masala.   


Fried Zucchini Blossoms


12-15             zucchini flowers

Batter
1 c                   flour
1t                     salt
1 t                    garam masala
1c                    club soda, cold

Stuffing
1 c                   ricotta cheese
1 t                    lemon zest
                        Thyme, basil
                        Salt, pepper


1.  Remove stamens from inside the flower, being careful not to rip the petals.  You can use a pair of tweezers or even long scissors. 

2.  Mix ricotta with zest, herbs and spices- these herbs came from right outside my window!!

3. Using a teaspoon, fill the bottom of each blossom with a little cheese- be sure not to overfill them!  Remember, a little goes a long way here and too much filling will burst in the hot oil.  Leave the filled flowers in the fridge until you are ready to fry.


4. Mix the flour, salt and spices together, then add the cold club soda and stir with a fork to get the lumps out.  The batter should be runny but thick enough to hold to the blossoms. 


5. Heat vegetable oil in a deep pot to 375° F.  Set up a frying station with the batter and blossoms, and a rack or plate lined with paper towels. 

6.  When the oil is hot you can start dipping the blossoms into the batter and frying them.  I gave a little twist at the top of the flower to keep the cheese in.  Fry until the batter is golden all around.  If the cheese starts to leak out into the oil, it will cause a burnt mess, so fish out the busted ones- you can crisp it later in the oven for a minute or two.

  Ahhh, fried stuff with cheese… is there anything better?


Thursday, July 7, 2011

Sour Cherry Clafoutis

    It’s been nearly six months since my first blog post, back in the freezing winter when I pined away for fresh fruit and veg, wondering if anyone out there was listening or cared.  And now, friends from every corner of the country have been sending me pictures of recipes they’ve tried out, telling me they’ve been following, or commenting on a post… it’s an amazing feeling!  I couldn’t have predicted how much fun it would be to share pictures and stories, and I’d never have kept up with it if not for all the words of encouragement.  So for those of you out there reading this, thank you for sticking with me so far!  
  Back in January I was dreaming of market stalls bursting with produce, and well, the season is truly upon me now.  My newest flip flops are already well broken in and I’m up to three shower days and strictly up-do’s.  And with the summer stench of garbage ripe in the sticky air, it’s a challenge to leave the cool comfort in front of the a/c.  But hey, I’m not complaining- because at the Greenmarket the farm stalls are chock full of color: red orange yellow green, even purple and pink and every shade in between.  There’s more fresh local dirt candy than I can hope to eat, and I’m loving every green leaf, firm zucchini and crunchy radish. 


   And the best part about the summer market has to be the ripe juicy stone fruit- nothing tastes better than a dripping syrupy peach in season or a sweet black cherry warm from the sun.  While most of the year we are restricted to making our pies with rubbery, watered-down IQF sour cherries, for these few glorious months we can get our hands on the ruby-red real thing! 
  What better way to showcase the tart tangy gems of the season than in a creamy clafoutis.  This dessert is so simple and works with any berries or stone fruits, and there is something deeply homey and comforting about it- talk about the way to a man’s heart…  Sweet milk and eggs soak into the cherries, whose sour tang cuts the rich eggy custard in turn.  Served warm, at room temperature or cold, it makes a great treat for breakfast, tea-time, or after a light summer dinner.
 
Traditionally clafoutis is crust-less, baked in a buttered pie plate or even a hot cast-iron pan- but I poured mine into a par-baked tart shell I blind baked with marbles. 


Sour Cherry Clafoutis
1 ¼ cup       milk
¼  cup         cream
3                 eggs
½ cup          sugar
½                vanilla bean
½ cup         almond flour
1 t               salt
3 cups         sour cherries, pitted
1                 9” buttered pie dish or
                   Par-baked tart shell


1.  Wash and clean the cherries and remove the pits.  And don’t go out and buy a cherry pitter either, here’s a guide on how to pop them out with a paperclip!
2.  In a bowl, whisk together the milk, cream, sugar, salt and eggs.  Split the vanilla bean lengthwise and scrape the seeds out into the milk mixture.  If you don’t have a bean, substitute 1 T vanilla extract.
3.  Break up any clumps in the almond flour and whisk it into the milk and eggs (sub AP flour if you need to)

4.  Arrange the cherries in your dish, pour the custard over the fruit and bake at 375°F  until the custard is set and the top is golden brown, about 35-45 minutes. 


Saturday, June 25, 2011

Pickle Juice


  PJ and I are both crazy for pickles, and it seems I can never buy enough of them- even the biggest jar I can find doesn't sit in our fridge for more than a few days, especially if they're the crunchy half sours from Russ and Daughters.      


  We decided what we needed was our own supply of crisp pickled kirbys in a container so big that even he couldn't reach the bottom of it.  I picked up some vinegar, coriander, garlic and fresh dill and PJ got a huge glass jar and a bagful of mini cucumbers.  We washed and scrubbed the dirt off of them and their skins turned bright and shiny green.   
 

  Then PJ toasted the coriander seeds until they started to pop and smell delicious- he threw in some whole black peppercorns and a couple of bay leaves.


  He added white vinegar and heated it so the salt could dissolve, then he chilled and diluted the brine with ice cubes. 


  I piled in the cucumbers in the clean jar with peeled garlic cloves and sprigs of fresh dill, then PJ ladled the cold liquid over top.


  And into the fridge! 


  Two days later the cucumbers have already taken on a tart dill-pickly flavor that will just keep getting better.  Putting the cold brine on them has kept them crisp and bright green in color. 


  Finally, a solution to our pickle- we'll be enjoying these crunchy beauties for months to come.  Stay tuned for updates!

Thursday, June 23, 2011

Another day, another garden

  A few days ago I spent the afternoon with my friend Michelle and her adorable little son, and on our wanderings she bought me a beautiful petite white rose plant.  I got it home and set it out on my window sill, and the tight buds unfurled into miniature flowers overnight.  What a miracle!  What a feeling!  Suddenly, I was overcome with the overwhelming urge to plant something and watch it grow- blame it on the persistent ticking of my biological clock.

 I've never been one for getting my hands dirty- with dirt, that is- but those of you who know my mother know that gardening has long been a passion for her.  How many sweltering summer afternoons could I spot her floppy canvas hat out in the flowering beds in our backyard, down on her hands and knees, orange clogs on her feet and trowel in hand?  And me, sitting inside where the central a/c kept me nice and cool, shaking my head and thinking she must be crazy.  But I guess it's like they say, eventually we all turn into our mothers.


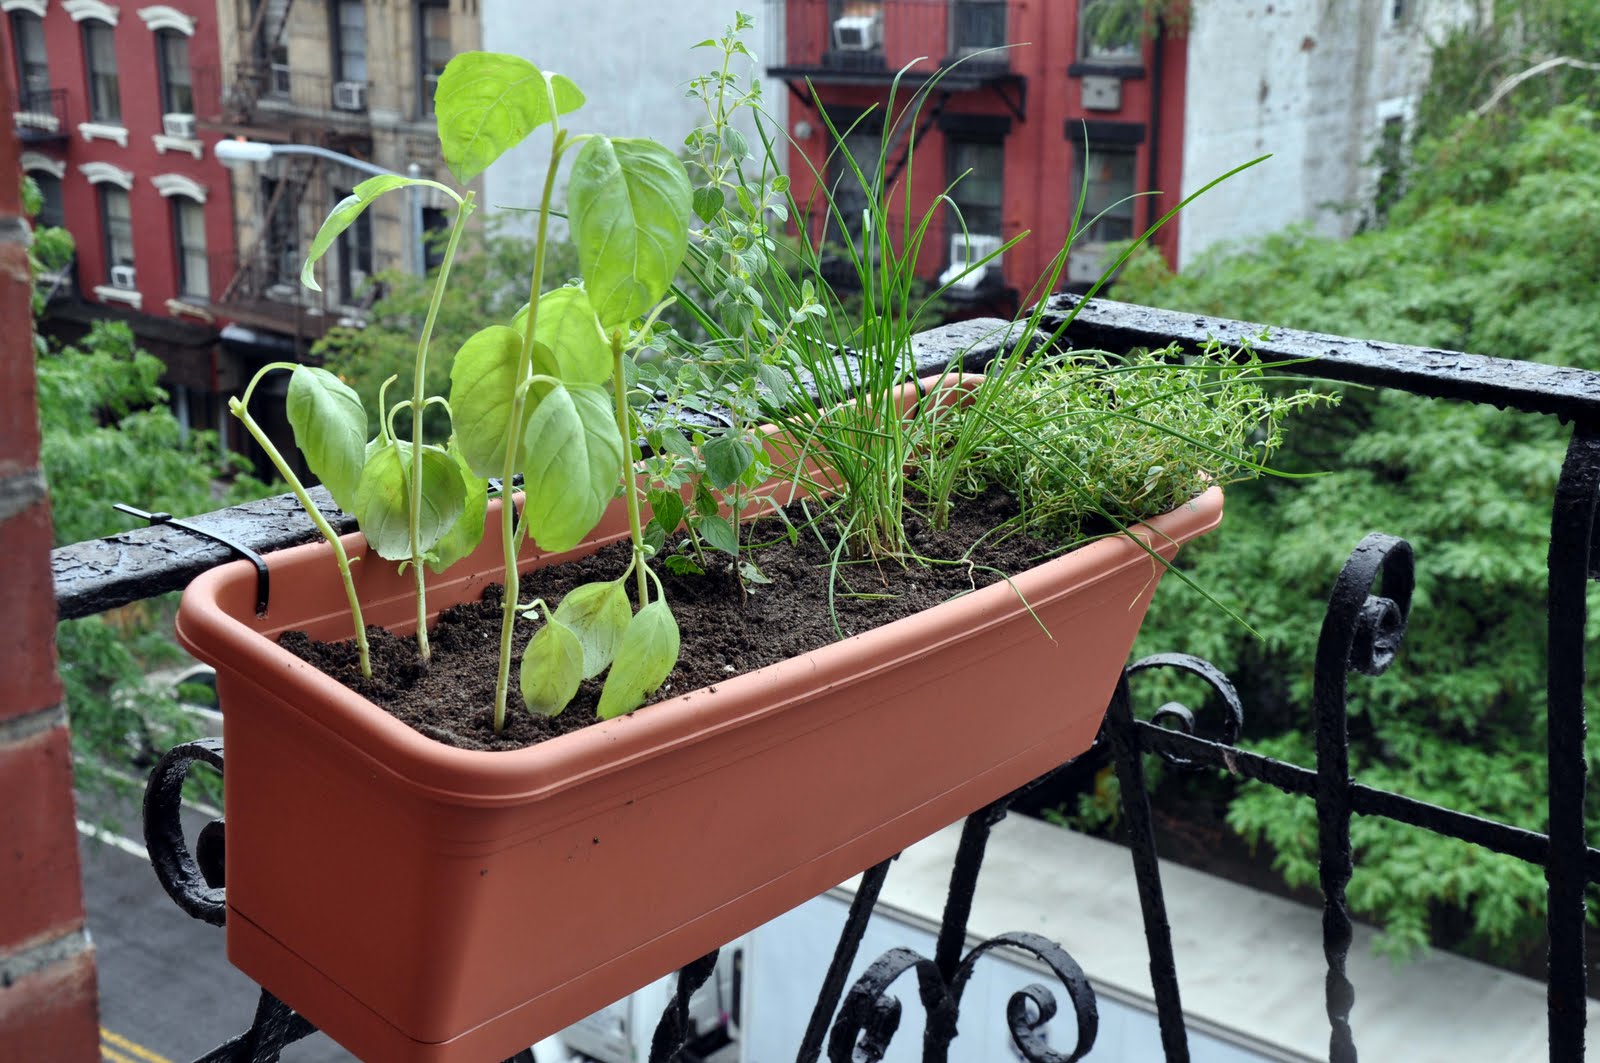
  Being in a tiny NYC apt my gardening space is limited, but I have always wanted a window-box herb garden.  I went to the Greenmarket and picked up some plants, then to the hardware store for a box and potting soil. 

Chives, Oregano, Basil and Thyme

  I drilled a few holes in the window box and attached it to the railing, then filled it with soil and planted my herbs.  There I was- on my hands and knees, trowel in hand, sweat pouring down the sides of my face, and loving every minute.  I pictured myself enjoying garlicy home-made pesto, and sprinkling chopped chives into cool cucumber salads, and spicing up fresh tomato sauce with oregano plucked from my garden. 
 
  And as I patted down the last of the dirt and stood back to take in my work, I felt a great calm come over me.  I'm going to take good care of you, I promised my little ones.  You're going to be very happy here...

So it begins!


Wednesday, June 15, 2011

See How My Garden Grows


    A few months back I booked a HUGE wedding cake for a bride who dreamed of a cascade of hand-made sugar flowers sweeping down her six tiers.  It had been a while since I spent any serious time making flowers out of gum paste- not since my days as an unpaid intern at the flower factory so many years ago.
Back then I was at the bottom of the chain of production, and we interns were in charge of making most of the filler flowers- hundreds of hydrangea, slews of snapdragons, rows and rows of rose buds, and leaves, leaves, leaves…  I passed an entire week- every day, all day- rolling, cutting, veining and shaping leaves on wires for our delicate sugar roses that came in all colors- the week after was spent dusting the leaves with colored powders, dipping them in a noxious sticky glaze and tying them together with floral tape.  And when I had tied the very last leaf with a sigh of satisfaction and relief, I was instructed to pull out the green gum paste and start production all over again. 
  I never got my hands on any of the really fun stuff- like the shimmery green Cattleya orchid petals or the bright red parrot tulips, or even the blooming roses, though I saw hundreds of them being made around me.  So it was no wonder I always thought flower making a mind-numbingly monotonous endeavor that just wasn’t really for me.

 Making gum paste flowers, just like growing real ones, takes a lot of planning, labor, and a practiced hand.  Every bud and center is shaped between the fingers, each orchid throat painted with a thin brush. 
  These days things are different and I’m not an intern anymore, so I was excited about the idea of making some of the more complicated flowers from start to finish, not least of all because of all the fun new cutters and veiners and tools I got to buy.  Other equipment I had to make, like my drying racks and petal cups.  I chose the flowers types based on my conversation with the florist, working in shades of green and purple.


  For the Cattleya orchid and the Peony, each petal is cut separately, pushed onto a wire, shaped and dried wavy to give it movement. 


    Other flowers like roses, hydrandgea and calla lilies are shaped and dried upside-down overnight.   

  Once the petals and flowers have dried hard, they are brushed with petal dust to bring out highlights and shadow, like makeup. 


  The process is completed over several days with little to show.  And then suddenly, when all the centers and petals and buds and leaves are dry and dusted and ready to be tied, do you begin to see your garden grow!


  The cake was so large that I had to take it in two pieces...


Sunday, June 12, 2011

Strawberry Oat Muffins

  Wedding season is upon me and this weekend has been busy with baking, filling and icing layer after layer of spongy cake with creamy frosting.  I've never been so busy, which is a great feeling!

Vanilla cake with sliced Strawberries and Lemon Buttercream

  I had quite a few leftover strawberries after making this simple cake, so I threw together these muffins for a late breakfast treat. 

Strawberry Oat Muffins

2 cups         Rolled oats
2 ¼ cups     AP flour
2 T              baking powder
1 cup          brown sugar
½ cup          sugar
1 ½ t           salt
1 t               powdered ginger
2                 eggs
2 cups         milk
1 cup          butter, melted
2 cups         strawberries, chopped

Yield: 2 dozen


  Muffins need very little mixing so I opted to stir by hand in a big bowl- I figured my poor overworked KitchenAid needed a much-deserved rest anyway.

1.  Chop strawberries and sprinkle them with some sugar to macerate.  You can use frozen berries if you need to, just allow them to drain a bit before chopping them.

2. Combine dry ingredients in a large bowl and stir with a whisk to break up lumps.  Mix milk, eggs and melted butter in another bowl. 


3.  Pour liquids into dries and stir until just combined, then allow the mixture to stand for 5 minutes to let the flour absorb the liquids.  Stir in the strawberries and scoop batter into lined muffin pans.  Top each muffin with a strawberry slice, then sprinkle more sugar on top and bake at 350° F for 20-25 minutes until the tops are golden brown.


 The smell of these muffins baking is filling my apartment with the aroma of Strawberryland, and I can hardly wait to crack one open...