Friday, February 18, 2011

Taco To Me


Warm corn tortillas and beer-marinated steak with a salsa of
avocado and tomato 

   For the first twenty-four years of my life there was only one type of taco: a hard yellow shell filled with packet-spiced ground beef, shredded orange “Mexican” cheese and ribbons of iceberg lettuce, topped with dollop of sour cream and some Pace Picante spooned straight from the jar.  And don’t get me wrong, it was delicious- in that Kraft Mac and Cheese, Oodles of Noodles, Ellio’s Pizza kind of way.  Forgive me, I didn’t know any better… it was before I had my Tortilla Epiphany.
  Enter PJ, who grew up in Brownsville, Texas- just five minutes from the border with Mexico.  We had only been dating a few months when he took me down to his hometown to meet the family, the friends, and the food he grew up with- suddenly, the idea of Tex-Mex took on a whole new meaning. 
  It meant soft corn and flour tortillas pressed by hand.  It meant tender, savory shredded meats, crumbly mild white cheeses, and fresh chunky salsas in which you could actually taste and identify separate vegetables- like tomatoes and onions and chilies, oh my!  It meant drizzled with decadent crema and served with slices of buttery avocado and tart little wedges of lime.  That was when I discovered that a “taco” wasn’t just one thing after all, and it certainly wasn’t what I thought it was. 
  And from the looks of all the “authentic” taco joints popping up on every other block, it seems our city has experienced a similar revelation somewhere along the line.  In the last three days alone, I have walked by no less than five new establishments offering their own specific style of taco- from Oaxacan, to Guatemalan, to Southern Californian- even Korean.  And sure, we still have a long way to go to compete with the country’s major taco cities like L.A., Austin or Chicago, but it’s exciting to think that our Old El Paso days might finally be behind us! 

  When we had an impromptu get-together for the Super Bowl a few weeks back, PJ threw together a delicious spread to make tacos- as always, I was in charge of warming the tortillas.  He sliced the meat thin and seasoned it with my mother's cumin-salt, then and marinated it in Negra Modelo.


    He seared the beef in a smoking hot pan, then cut it up and returned it to the pan to brown it all around, getting a yummy caramelization on the meat. 


We picked up some sweet and crispy barbequed spare ribs in Chinatown that morning and PJ cut them up for Chino/Latino-style.  He also fried up a couple spicy pork sausages.

   He was so excited to use our brand-new Vitamix blender for the first time that he whipped up three types of salsas- a spicy tomato, a tomatillo with roasted garlic and cilantro, and a chunky one with avocado and onion .


These tacos were made in... New York City!  Get a rope.


  For a quick-fix dessert, I put together some ice cream sandwiches with store-bought cookies.  I went pretty classic with these, but the possibilities are endless!


Step 1: Scoop ice cream onto cookie base


Step 2: Press another cookie on top and squish down just until the ice-cream spreads to the edges.  Immediately return the sandwiches to the freezer for at least 1 hour to harden.


Step 3: Stuff your face!

 
To those of you out there actually reading this, thank you! 
If you like the blog so far, please click the button above to "follow" me!

Thursday, February 17, 2011

Palak Paneer

  Cooking, Serving and Eating were the first things I can remember learning were important- the pillars of family life.  Being a good Indian daughter meant I was making tea in the microwave just after I was walking and talking- pouring milk into the cup until the liquid matched the color of my skin, concentrating with my whole body so I wouldn’t spill a single drop as I made the long journey from the kitchen to the living room where my grandfather reclined in his big chair, and waiting with tingling anticipation as he lifted the cup to his lips.  And when, after slurping up his first sip, he would let out a satisfied sigh and turn to me with a smile saying, “Ahh, just the way I like it!”  …well, there was no better feeling in my little girl world.
            My earliest memories involve breathing in the warm, starchy mist that comes off a pot of rice the first time the lid is lifted off, jumping at the punchy hiss-and-whistle of the pressure cooker blasting steam clouds around my grandmother’s kitchen, and practicing rolling rotis and purees on a wooden board on the floor by the stove.  Tried as I might, I could never get them as perfectly round as she did with just a few expert passes under the rolling pin.
Spending time at her feet while she worked at the stove, I soon discovered that cooking was like magic and my grandmother was the magician.  Only she could take a doughy raw lump like the one she gave me to practice on and turn it into something delicious and wonderful, or so I was convinced. 
By the time I was 8, I had graduated to assistant fry cook.  I would perch on my little stool in front of the stove, my hands clasped behind my back as she slid a disc of soft dough down the side of the pot, her other arm gently blocking my way (though I had already gained a fearful respect for the hot oil.)  My slotted spoon at the ready, I watched with delight as the tiny bubbles started to form on the pale dough.  Suddenly, the puree would float up to the surface, the top alive with bursting bubbles.  Then it was my turn to take over.  While my grandmother went back to the six things she was inevitably doing at once, I slowly moved the disc around in the hot oil just as she had showed me until the pillow of dough puffed up like a tight drum.  Then I would press down on it, pushing it back under the bubbling oil, my heart dancing along with the satisfying sound of sizzling, my mouth watering with the smell of browning dough.  I gently turned the puree until both sides were the right color, then fished out the shiny fried dough and set it on a plate lined with paper towels.  That first puree always had my name on it, but I had to fight my impulse to tear right into it knowing that it was too hot to handle.  Finally, when I couldn’t hold out any longer I would take the golden puff in one hand and pop it with my other finger, inhaling with a smile as the puree blew its first and last breath onto my face.  
The kitchen was easily my favorite room in the house and I tried to spend as much time there as possible, (still true!)  Activities were staunchly divided across gender lines: the women and girls in the kitchen and dining room table, peeling, chopping and chattering- the men in the TV room watching tennis, drinking tea and eating peanuts.  And no matter where the boys were- outside or upstairs or in the basement- they were making a racket and causing trouble.  For my part I was never happier than when I was with the girls in the kitchen, snapping the tops off green beans or picking cilantro leaves, never more proud than when my grandmother announced to our dinner guests that I had fried the golden purees.  So from the beginning, there was food.  And not just eating it (which I was very fond of), but making it, presenting it, and watching other people eat it. 
Now I look back at those happy afternoons spent in the kitchen and I wonder what it will be like for my unborn daughter.  I am the one of the first generation of my family to be born in the US and I’ll always identify myself as an American, but I have never been in doubt of my Indianness- I never had to be.  I have a name no one can pronounce the first time.  I grew up absorbing the smells and sounds of my mother country all around me: hearing Aunties gossip in Hindi and going to the temple with Uncles, sitting cross-legged on the floor next to my cousin-sisters and brothers, eating with my fingers.  But now that I’m grown up, I don’t speak any Hindi and I don’t go to the temple and I almost never eat with my hands unless I’m holding a sandwich.  And having just married a white-boy, well I wonder how I am supposed to pass on that Indianness to my kids.
The best answer I have is to go back to the food.  I have every confidence in my green coconut curry and my garlicky pesto (probably because I don’t have a Thai or Italian grandmother); but I have never be fully satisfied with the Indian dishes I try to make, knowing I could always get a better beans bhaji or palak paneer at home.  But now that I’ve started thinking about a home of my own, I realize it’s on me to fill that home with the smells of cooked daal and sputtering cumin seeds- so my daughter knows something about being Indian, so she can make tea and roll rotis and take over as the best little puree fryer this side of the Ganges.
So, armed with my grandmother’s masala dabba and the memories of watching my mother make hundreds of Indian meals, I am determined to expand my repertoire to include some of the home-cooked dishes I grew up loving to eat. 
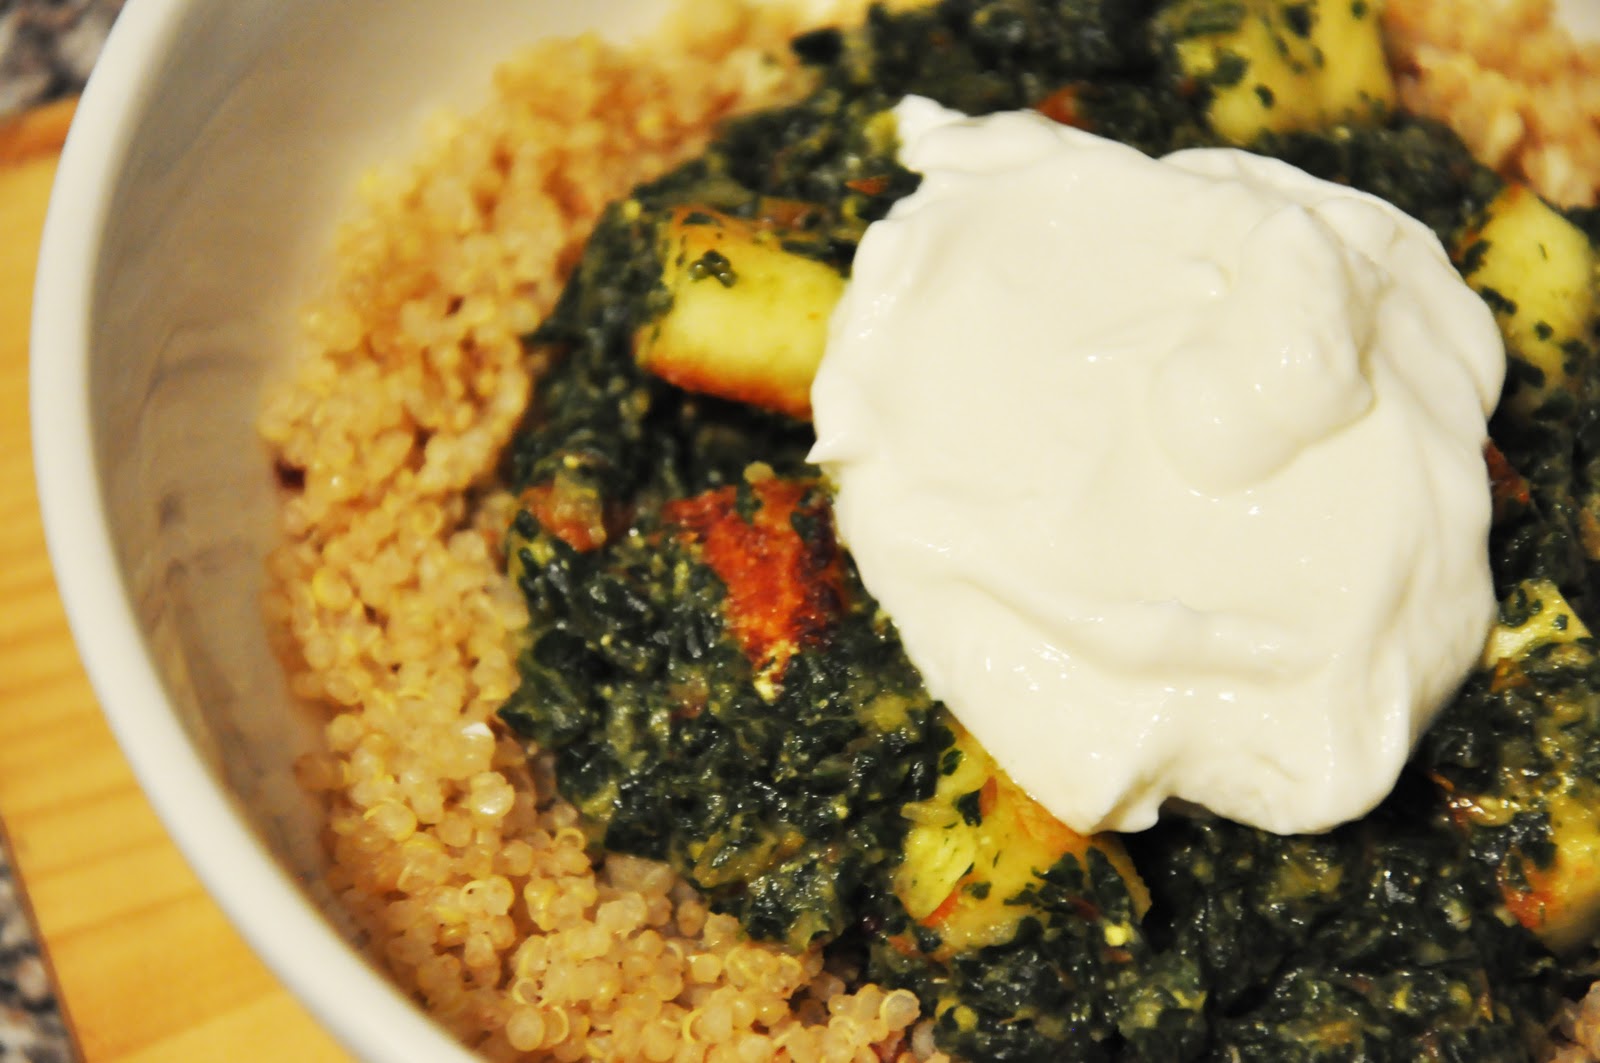
You can find a million recipes out there for Palak Paneer and no two are exactly alike.  Some will require you to blanch the spinach and some will use frozen, some call for buttermilk and others want sour cream, and some like it spicy while others prefer it sweetened with tomatoes.  But that is the wonderfully liberating thing about home-cooked Indian food: the same dish will taste different in every household, depending on the cook.  I’ve just been making it up as I go along and hoping for the best!  

Palak Paneer

1 block              paneer, cubed*
1 t                     cumin seeds
½ t                     mustard seeds
1 T                     ginger/garlic paste*
1                        onion, diced
                       tomatoes, diced
2 bunches          fresh spinach, cut into shreds
¼ c                    plain yogurt
¼ t                     turmeric                                             
                         oil, salt
*It’s tough to find fresh paneer, but you can find frozen blocks of it in most Indian groceries.  Let it defrost in the fridge overnight, or for a few hours at room temp.

*You can buy prepared ginger/garlic paste at the store, or make your own and keep it in the fridge to use in stir fries, omelets, curries… whatever!  Puree ginger and garlic in roughly a 1 to 1 ratio with a pinch of salt.
1. Coat the bottom of the pan in oil and fry the paneer until the cubes are brown on two (or more) sides.  Remove the paneer from the pan and set aside on a paper towel.    


2. On medium-high, heat some more oil in the pan then add the cumin and mustard seeds- they should sputter in the hot oil for a minute.  Then add the ginger/garlic paste and fry for another minute. 
3. Add the onion to the pan with a pinch of salt and sauté until they have softened, then add the diced tomato and cook for a few minutes more until the tomatoes have broken down.
4. Add the shredded spinach to the pan and toss with the tomato/onion mixture, then add the yogurt and combine.  Add a splash of water and cover the pan, turning down the heat to med-low.  Allow the spinach to steam for 3-4 minutes.


5. Once the spinach is wilted, use a food processor or stick blender to puree the mixture to your liking.  I prefer a bit of texture so I left it chunky.  If you want a smoother texture you can blend it more.
6. Return the puree to the pan and add the paneer cubes and turmeric powder.  Taste for salt and spices- you can always add more yogurt or ground spices at this point.  Cook for 5-10 minutes on medium-low heat to incorporate all the flavors.

Serve over rice (or quinoa) with cool yogurt and slices of cucumber on the side.

Want to see more attempts at Indian recipes?  Leave a comment and let me know!   

Thursday, February 10, 2011

Monogram Cake


Inspiration can be elusive; as hard as you might try to find it, ultimately it must present itself to you.  Sometimes a new design idea comes to me from the most unlikely sources- the light on a dewy spider web, a scrap of wrinkled wrapping paper, a vine creeping up a chain-link fence…  Other times it’s a bit more obvious. 


   I love it when a couple comes to me with a point of inspiration, something that really represents who they are together.  For this cake, I used the monogram, design and colors from the invitations to create a symmetrical pattern on the tiers. 


   The bride and I share a passion for Boston Cream Pie, so we came up with this delicious golden vanilla cake filled with vanilla bean custard and covered with a creamy chocolate ganache.  After slicing each cake, I piped a line of chocolate around the edge to act as a dam for the filling.  Then I spread a layer of vanilla bean custard and stacked three layers of cake.  


Next, I used a piping bag filled with ganache to coat the cake, smoothing the sides with a plastic bowl-scraper.


  When both cakes were filled and covered, they spent the night chilling in the fridge.  At every stage of building a tiered or sculpted cake, I work in and out of the fridge so that the frosting can harden before I move on to the next step. 
  The next morning, I pulled the cakes out and covered them with a thin layer of white fondant.  Fondant is a soft sugar dough that I roll out and lay over the cakes like a blanket.  It’s not necessary for every design, but I prefer covering my cakes with fondant- it makes my life a lot easier since it holds in the frosting and remains a dry surface to decorate on.
  These days, folks seem to have strong opinions about fondant thanks in no small part to the multitude of TV shows featuring cakes.  I always tell my couples that fondant is a purely aesthetic thing- there are certain looks you just can't achieve without it.  It won’t add to the flavor of the cake, but it certainly shouldn’t take anything away from it as long as you are using a good quality product.  I have found Satin Ice makes a fantastic fondant without that waxy, unappealing aftertaste.
Once the cakes were covered, I used a small cake pan to mark the top so that I knew where to place the dowels. 


  Dowels are a vital part of building a stacked cake, and a step that cannot be missed.  Imagine a beautiful cake sitting out at a party, the frosting slowly softening as it comes to room temperature… if there is no internal support for the tiers, what will prevent it from falling over or caving in on itself?  Nothing!  Too many people think making a wedding cake is a simple as piling a few cakes on top of each other, but without those people I guess there would be no Cake Wrecks...


   I used royal icing to secure the tiers and to fill in the seams- this gives the cake a clean and finished look.


   The trickiest part about this cake was matching the colors to the original invites.  I pulled the color of the text for the slate-gray bands, then filled a piping bag with a dusty lavender royal icing for the pattern.


   I scanned the invite and blew up the image to fit the cake, then printed out the pattern to create a paper stencil.  Then, I secured the stencil to the cake and marked the points with a very small needle- this would serve as a guide for piping the intricate pattern.


 Using water and a fine brush, I smoothed any points and bumps in the icing.

   Finally, I pulled the monogram image from the invite and piped the outline onto the center of the top tier, then filled in the details with the piping bag.  I used a silvery-gray edible paint to inscribe the initials.


Vanilla Bean Custard
This custard is delicious served warm over a piece of cake, or chilled in cups and topped with whipped cream.
2 cups                  whole milk
½                         vanilla bean*
½ cup + 2 T        sugar
2 Tbs                    corn starch
6                           egg yolks
2 oz                      butter, cold and cubed
pinch                    salt

1.  Combine the milk with 2 T sugar in a heavy-bottomed pot.  Cut vanilla bean lengthwise and scrape out the seeds with the back of the knife, then add the seeds and pod to the pot.  Bring milk to just under a boil, then cover and remove from heat.  Allow it to steep for 20-30 minutes.  This will extract the vanilla flavor.
2.  Meanwhile, whisk together the remaining sugar, salt and cornstarch in a bowl. 
3.  Once the milk is steeped, strain it to remove the pod and any fibers- the seeds will remain.  Add about ¼ c of the milk to the sugar/starch until it is liquefied, then add the yolks and whisk until smooth. 
4.  Temper the eggs by adding the milk to the sugar/egg mixture a bit at a time, whisking in between each addition.  Doing this will bring the eggs to the same temperature as the milk without allowing them to curdle.
5.  Return the custard mixture to the pot and cook gently over a medium-low flame, stirring constantly with a whisk.  After 4-5 minutes (depending on your pot), you should see the custard start to thicken.  At this point, beat the custard vigorously to prevent lumps.  Soon, you will notice the custard bubbling
6.  Keep whisking vigorously, using the whisk to scrape the sides and bottom of the pot.  This is hard work, but a great workout for the upper arms.  The custard must “boil” for 1 minute to cook out the starch flavor, so set a timer if you have one.
7.  As soon as the minute is up, immediately remove the pan from the heat and pour the custard into another container so it will not continue to cook.  Stir in the cubed butter- this will give the custard a shiny look and a silky mouthfeel.   *If you can’t find a vanilla bean, you can use vanilla extract instead.  Add 2 T at this stage.
Store in the fridge for up to three days, cover with plastic touching the surface of the custard to prevent it forming a skin.

Monday, February 7, 2011

PJ's Day Off


When they find out what we do for a living, the first thing people want to know is who is in charge of the cooking in our house.  Most days it’s me, but every so often PJ has the time and inclination to make a meal and I’m the lucky one who gets to eat the delicious results of his inspiration.


Last Sunday I made a trip to the store, and he threw together a lemony seafood pasta and arugula salad with warm shitake mushrooms.


He started by soaking some cherrystone clams in salted water to remove the sand, then he extracted the liquor to use in the sauce.


With the precise cuts of a surgeon, he peeled and cleaned the shrimp in no time. 


He cooked the shrimp with garlic and chili flakes, then deglazed the pan with the clam liquor and white wine.   

He added the clams back in and garnished the sauce with fresh chopped parsley.  He finished with butter, though I couldn't say how much since I looked away when he put it in- some things are best left unknown…

Meanwhile he started the mushrooms in a hot pan, searing them to bring out their meaty flavor. 


Deglazing with sherry vinegar

When the mushrooms were ready, he added the arugula and tossed them together- the pan juices made a bright and complex dressing.


He cooked the angel hair in salted water, then added the pasta to the pan, finishing with lemon zest and juice. 


Served with a glass of Greco di Tufo that he used in the sauce, it was a simply delicious Sunday dinner.